I will go over the problem that SSO (Single Sign On) solves and why it's a beneficial and powerful implementation. I will also explain who is involved in this implementation, meaning what kind of people you'll need. Finally I will explain in great detail the tasks involved for each person to get this solution implemented.
Disclaimer: This article was intended for use with Oracle E-Business Suite 12.1 and Oracle Access Manager 11.1.1.5
Why SSO?
SSO is SSO, it means exactly that. The end user will provide credentials only once, be authenticated and then logged into the application. If you go to oracle.com today, sign in with your credentials, be successfully authenticated and log in. You can open up another tab, go to support.oracle.com click the Sign In button and be logged into My Oracle Support, all without having to provide credentials a second time. You could do the same thing with Google. You log into Google, and you are instantly logged into all other applications such as; GMail, Google Calendars, Google+, etc...
If the problem isn't clear, the problem is that without SSO, the user will have to provide credentials for every application they want to use. Could you imagine having to log into Google, and then if you wanted to use your GMail, log in again. And then log in another time to see your Calendars. And all these would potentially have different logins and passwords. It'd be a complete nightmare and a real hassle for the end user.
SSO solves all these problems, and at the same time, condenses the amount of user credentials that have to be saved in the backend and be remembered in databases. SSO provides the end user with a much more fluid workflow and intuitive experience. The user will only have to remember one credential for any application that is implemented and utilizes SSO. Logout can be configured the same way. A Global Logout can be configured so that when you logout of one application, you will be logged out of all of them.
Who's Involved?
For E-Business Suite Single Sign On, you will need a DBA / EBS Administrator as there a few tasks they'll have to take care of for you, mostly in the backend. You will need an IAM Administrator who will pull most of the leg work as there are numerous OAM configurations involved. At the same time, you'll have your IDM Administrator take care of several tasks for you as well.
Overview Diagram
This is an excellent flow diagram of how this whole entire process works.

Key Components
Some of the key components for EBS and OAM integration are as follows:
- EBS Profile Options
- OHS / Webgate - Oracle HTTP Server
- Access Gate
- OID - Oracle Internet Directory
- Oracle Weblogic Server
Software Required
The software required in order to get this solution and implementation going are as follows:
- Oracle Access Manager
- Oracle Internet Directory
- OHS - Oracle HTTP Server and Webgate
- Access Gate
Apply
Now we'll get into more of the nitty gritty of things. I will go through each of the three administrative tasks and explain what's involved. Above all though, it's all about teamwork to achieve a common goal.
Apply - DBA / EBS Administrator
- Apply the appropriate FND patch corresponding to your Oracle E-Business Suite Release Level (ie. Release 12.1.2, 12.1.3 Req Patch#: 12387976)
- DBA's will have to create an FND user with No Responsibility
- Name it: OAM11GLOGIN / xxx
- Assign 'Apps Schema Connect Role'
- Create DBC File for the EBS Instance
- Activate the application server security system by setting the server_id = 'SECURE' for the AUTHENTICATION node in the fnd_nodes table.
- Make a backup copy of the $APPL_TOP/admin/<SID>_<hostname>.xml context file
- Edit the file and locate the following context variable: s_appserverid_authentication
- Set the parameter equal to SECURE
- Run Oracle E-Business Suite AutoConfig to instantiate the changes
- Configure Oracle E-Business Suite Profile Options
Apply - IAM Administrator
Install and Configure Oracle E-Business Suite Access Gate
- Log into your IAM Box.
- You'll need the zip file / patch: p12796012_R12_GENERIC or whichever one for your EBS Instance version.
- Create appsutil/accessgate/ebsxxx subdirectory tree under $MW_HOME directory. (xxx you can use for environment naming convention. dev,tst,uat,prd)
- Copy the contents of p12796012_R12_GENERIC there ($MW_HOME/appsutil/accessgate/ebsxxx).
- mkdir -p $MW_HOME/appsutil/accessgate/ebsxxx
- cd $MW_HOME/appsutil/accessgate/ebsxxx
- cp -R ~/OAMFiles/p12796012_R12_GENERIC/* .
- cp ~/OAMFiles/DBCFiles/XXX/* .
- cp -R ~/OAMFiles/plan .
- cp ~/OAMFiles/custom/fndauth.war .
- Copy the fndext.jar to the lib subdirectory in the directory tree for the Weblogic Server domain to which the application will be deployed.
- cp fndext.jar $DOMAIN_HOME/lib
- Restart the Oracle Weblogic Server process. Admin Server of the IAM Domain
- $DOMAIN_HOME/bin/stopWeblogic.sh
- $DOMAIN_HOME/bin/startWeblogic.sh
Install and Configure Oracle E-Business Suite Data Source
- Login into your IAM or IDM Admin Console
- Click Data Sources
- Click Lock & Edit
- Click New > Generic Data Source
- Call it DS_EBS
- JNDI Name: jdbc/DS_EBS
- Database Type: Oracle
- Driver: Oracle's Driver (Thin) for Instance Connections; Version 9.0.1 and later
- Uncheck 'Support Global Transaction'
- Go to Connection Pool Tab
- URL: jdbc:oracle:thin@hostname:port:service_name
- Driver Class Name: oracle.apps.fnd.ext.jdbc.datasource.AppsDataSource
- Properties: user=OAM11GLOGIN dbcfile=/opt/ora/iamxxx/middleware/appsutil/accessgate/ebsxxx
- Password: xxx
- Make sure Test Connection on Reserve is checked
- Maximum Capacity: 200
- Activate Changes
- Go into Monitoring > Testing Tab and test the Data Source and make sure it is successful.
Deploy and Configure Oracle E-Business Suite FNDAUTH WAR File
- Navigate back to Home and click Deployments
- Lock & Edit
- Click Install
- Install the fndauth.war file using the Plan.XML from the /.../appsutil/accessgate/ebsxxx folder
- Check mark the IAM or IDM Admin Server
- Name it fndauth or something of your liking
- Make the Context Root /fndauth (This will have to be unique per EBS Instance)
- Activate Changes and make sure the fndauth application is in 'Active' state after you activate
- Shutdown the IAM or IDM Admin Server, clear cache and tmp folder, and restart
OHS Server Configurations / Integration with OAM
- Set Environment Variables on OHS Box
- Register WebGate 11g on Oracle Access Manager 11g
- Configure redirection between HTTP Server and WebGate Server Instance
- Setup OHS Proxy redirection for all protected applications
- Modify the EBS.conf file, ensuring that all OHS Proxy / VIP and Access Gate Applications server references point to your target environment
- EBS Conf File Example:
- Restart your HTTP/OHS Server
- NameVirtualHost *:80
- <VirtualHost *:80>
- ServerName hostname:80
- ServerAdmin xxx@xxx.xxx
- RewriteEngine On
- RewriteOptions inherit
- UseCanonicalName On
- # EBS Access Gate
- <Location /fndauth>
- SetHandler weblogic-handler
- WebLogicHost xxx.xxx.xxx
- WebLogicPort 7001
- </Location>
- </VirtualHost>
Configure Global Logout
In this step, you will complete the changes required to configure centralized logout and clean up any activate Oracle E-Business Suite sessions upon single sign-out.
- Load the sample cleanup file you copied to your web server earlier into an editor. (oacleanup.html) ($HTTP_INSTANCE_HOME/htdocs/public/oacleanup.html)
- Make the following changes for your deployment:
- Find the following line: <script type=”text/javascript” src=’/CONTEXT_ROOT/OAMLogin.jsp?mode=cleanup’></script>
- Replace CONTEXT_ROOT with the value of the context root for any deployment of Oracle E-Business Suite AccessGate protected by this WebGate For Example:
- <script type=”text/javascript” src=’/fndauth/OAMLogin.jsp?mode=cleanup’></script>
- Do the following when using a multi-node environment:
- Search for the following line: function doLoad()
- If you have additional deployments of Oracle E-Business Suite AccessGate protected by this WebGate, or any other WebGate, add a callback for each additional Oracle E-Business Suite AccessGate deployment protected by this WebGate where indicated in this function. For Example:
- logoutHandler.addCallback('/fndauth_fin02/ssologout_callback');
- logoutHandler.addCallback('http://webgatehost2.example.com:7780/fndauth_test/ssologout_callback');
- You may add callbacks to any custom applications requiring post-logout actions, as well.
- In the same doLoad() function, list any cookeis to be removed after the logout callbacks are completed. For Example:
- logoutHandler.addCookie('CorpBISessionID');
- If you are using domain cookies with your WebGate, add another argument to the callback function with "domain=" followed by the name of the domain; for example:
- logoutHandler.addCookie('ObSSOCookie','domain=.example.com');
- If you are issuing callbacks to servers that are slow to respond, you can increase the default timeout (2 seconds) for the cleanup script. The timeout prevents the cleanup script from hanging due to an unresponsive server; an increased value will ensure all callbacks are processed cleanly. A larger value will not increase the time to process the cleanup if all servers respond before the timeout expires.
- Repeat the steps above for every WebGate in your environment that is protecting Oracle E-Business Suite environments using Oracle E-Business Suite AccessGate - This is when you have a multi-node environment.
- If you are integrating with WebGate 11g, verify the Logout URL parameter is set to "/logout". Specifically, the value must not point to the cleanup script, and must be changed from the default, which is "logout", to avoid initiating an OAM logout before the cleanup script can be executed.
- If you are using an existing WebGate that is protecting other applications, and those applications rely on another setting defined here, you can leave the setting unchanged. However, if another application logs out through this WebGate, you will need to ensure the oacleanup.html script is executed to clean up any Oracle E-Business Suite resource and sessions as well. For example, you can customize your existing logout script so that it also performs the actions in oacleanup.html.
Configure Oracle Access Manager
- Define an Identity Store (This may have already been done during Oracle Access Manager Install - if so, please skip)
- Log on to the Oracle Access Manager Administration Console (http://oam_server_host:port/oamconsole/)
- Click on the System Configuration tab. In the Common Configuration panel, expand the Data Source subtree. Highlight User Identity Store in the tree, and choose Actions -> Create
- In the window that opens, create an identity store named XXXOID, with Store Type "OID: Oracle Internet Directory". Provide the connection information, Bind DN and Password, Search Base, and other required information for your OID Database. For the remaining attributes, enter the following:
- User Name Attribute: uid
- User Search Base: cn=Users,dc=xxx (replace with the appropriate values for your directory)
- Group Search Base: cn=Groups,dc=xxx (replace with the appropriate values for your directory)
- Click Apply to Save the information.
- Check Host Identifiers. Verify the host identifier for your WebGate is properly defined by clicking on the Policy Configuration tab, and expanding the subtree for Host Identifiers under Shared Components. You should see an entry matching whatever you entered as t he agentName when registering the WebGate.
- Double-click the entry for your WebGate and verify that the Operations column contains the fully qualified domain name (FQDN) of your WebGate host (for example, "webgatehost.example.com"), and the port where Oracle HTTP Server is running. If the name of your host identifier is different from the FQDN of the host (for example, "webgatehost"), make sure that appears in the Operations list as well. If it does not, click on the "+" icon and add it (no port). Add additional HostName, port combination as appropriate for your environment eg. VirtualHosts, OHS VIP, OHS Phsyical HostNames etc.
- Create an authentication module
- Click on the System Configuration tab, expand the Authentication Modules subtree, and highlight the LDAP Authentication Modules node. Choose Actions -> Create.
- Enter the following information in the Create LDAP Authentication Module region, and click Apply:
- (XXX: DEV, TST, UAT, PRD - environment based on your liking)
- Name= OID
- User Identity Store = XXXOID
- Create an authentication scheme for your protected resources.
- Click on the Policy Configuration tab, highlight the subtree Authentication Schemes under Shared Components, and click the "*" (Create) icon.
- Enter the following information in the Authentication Schemes region, and click Apply:
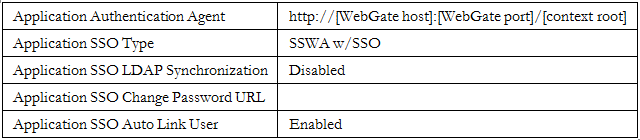
- Name: EBSAuthScheme
- Description: Protect EBS resources using EBS AccessGate
- Authentication Level: 1
- Challenege Method: FORM
- Challenge Redirect URL: http://[OAM server]:[port]/oam/server
- Authentication Module: xxx (This is what is used to authenticate the user / create cookie as well)
- Challenge URL: http://[WebGate host]:[port]/[context root]/OAMLogin.jsp
- Context Type = external
- Configuring Application Domain
- Go into the Policy Configuration Tab. Expand Application Domain. You can either create a new Application Domain or use the OHS11gAgent.
- Under the OHS11gAgent > Authentication Policies and Authorization Policies, create or make sure there's a Protected and Public Resource Policy
- Double click Resources under the OHS11gAgent Application Domain and create the following Protected Resource Policies:
- OHS11gHost:/[context root]/
- OHS11gHost:/[context root]/.../*
- Create the following Public Resource Policies:
- OHS11gHost:/[context root]/style/
- OHS11gHost:/[context root]/style/.../*
- OHS11gHost:/[context root]/OAMLogin.jsp
- OHS11gHost:/[context root]/OAMLogin.jsp/.../*
- OHS11gHost:/[context root]/ssologout.do
- OHS11gHost:/[context root]/ssologout.do/.../*
- OHS11gHost:/[context root]/ssologout_callback
- OHS11gHost:/[context root]/ssologout_callback/.../*
- OHS11gHost:/[context root]/loginFn
- OHS11gHost:/[context root]/loginFn/.../*
- OHS11gHost:/[context root]/js
- OHS11gHost:/[context root]/js/.../*
- OHS11gHost:/[context root]/loginHelp.html/
- OHS11gHost:/[context root]/loginHelp.html/.../*
- OHS11gHost:/[context root]/passwordhint
- OHS11gHost:/[context root]/passwordhint/.../*
- OHS11gHost:/public/oacleanup.html
- OHS11gHost:/public/oacleanup.html/.../*
- OHS11gHost:/public/ssocleanup.html
- OHS11gHost:/public/ssocleanuo.html/.../*
- Modify Authentication Policies for the EBS Application
- On the Policy Configurations tab, expand the Application Domains subtree, then expand the policy with the name of OHS11gAgent. Expand the subtree named Authentication Policies and double-click Protected Resource Policy.
- In the tab opened to the right, change the setting for Authentication Scheme to EBSAuthScheme.
- Enther http://[WebGate Host]:[port]/[context root]/OAMLogin.jsp for the Failure URL, replacing the value of /context root] with the appropriate value, which must be an absolute URL.
- Click Apply to save your changes
- Click on the Resources tab in the bottom section of the detail panel. If the default root resources are listed (/ and /.../*), remove them from this authentication scheme. Since you will likely be setting up additional authentication schemes for other Oracle E-Business Suite instances, it's important not to duplicate these resources in each scheme. You can move these resources to a different (default) authentication scheme, to ensure that you are protecting other resources on the HTTP Server where your WebGate is installed.
- To define the policy responses, click on the Responses tab, then click on the "+" icon and add the following two rows. Click Apply to save your changes.
- Modify Authorization Policies for the EBS Application
- On the policy Configuration tab, expand the Application Domains subtree, then expand the policy with the name OHS11gAgent. Expand the subtree named Authorization Policies, and double-click Protected Resource Policy.
- Enter http://[WebGate host]:[port]/[context root]/OAMLogin.jsp for the Failure URL, replacing the value of /[context root] with the appropriate value, which must be an absolute URL.
- Make sure the checkbox for "Use Implied Constraints" is checked.
- Define the policy responses by clicking on the Responses tab, then clicking on the "+" icon and adding the following two rows. Click Apply to save your changes.
Name
|
Type
|
Value
|
USER_NAME
|
Header
|
$user.userid
|
USER_ORCLGUID
|
Header
|
$user.attr.orclguid
|
Name
|
Type
|
Value
|
USER_NAME
|
Header
|
$user.userid
|
USER_ORCLGUID
|
Header
|
$user.attr.orclguid
|
Apply - IDM Administrator
- Create an LDIF File (OID_dsaconfig.ldif) containing the following:
- dn: cn=dsaconfig, cn=configsets, cn=oracle internet directory
- changetype: modify
- add: orclallattrstodn
- orclallattrstodn:cn=orcladmin
- Run the following to execute the command from the newly created LDIF File:
$ORACLE_HOME/bin/ldapmodify -h [ldaphost] -p [ldapport] -D [DN] -w [orcladmin passwd] -v -f [ldif_filename]add orclallattrstodn:
cn=orcladmin
modifying entry cn=dsaconfig, cn=configsets,cn=oracle internet directory
modify complete
Good One Pierre.. couldn't have been better
ReplyDeleteIt is good post. And this content is very nice to read.scholarship essay writing service
ReplyDeleteNice site Pierre. Good work. Need this to work for the CAP now
ReplyDeleteNice site Pierre. Good work. Need this to work for the CAP now
ReplyDeleteLiked the way you have explained. Keep sharing. Thanks.
ReplyDeleteebs upgrade from 12.1 3 to 12.2 8